 | Full Text Navigation box |
Print the Help...
Hints for Using Ovid Output Features
Problems with Viewing Full Text Graphics?
Full Text Navigation box
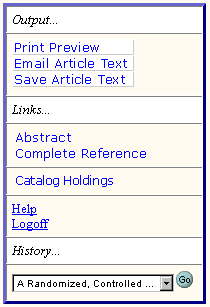
The Full Text Navigation box appears adjacent to the Outline of every Full Text document you display. It allows you to choose the way you display, print, save, or email your Full Text documents. It also facilitates your movement between Full Text options by tracking a history of links you follow, and providing links to abstracts and complete references of the Full Text documents you view.

Use the Output section of the Full Text Navigation box to prepare your document for printing, emailing, or saving the text of an article. With Full Text Navigation output options, you can view all elements of Full Text documents on your screen, print the text (with or without graphics), email text to any Internet address, or save text to an ASCII or HTML file. Click the appropriate button to perform the following output functions through the Full Text Navigator.
- Print Preview. While displaying the Full Text of a document you want to print, click the Print Preview button. Ovid presents the Print Preview Options screen. There, choose a size for graphics from the scroll-down menu. Settings include No Figures/Tables (to eliminate all graphics from your printout), Full size (to include graphics at their original size), Medium (Macintosh) which can be selected for medium-sized graphics in your printout (this selection is best for Macintosh users), and Small (Thumbnails) which creates place-marker sized graphics. Make your selection, then click the Continue button to proceed. Ovid redisplays the document without the Ovid navigational and features buttons. From this display, invoke your Web browser's print function to print the Full Text document as it now appears on your screen.
- Email Article Text. While displaying the Full Text of a document you want to email, click the Email Article Text button. Ovid presents you with an Email Article screen. Specify a complete email address, enter your own address into the From line, and include a subject and annotations if you so desire. Then click the Send Email button. Ovid emails the article to the address indicated, then shows the status of your email on an Email Confirmation screen. Note: To send an article to more than one recipient, separate addresses by a comma. Select the checkbox entitled "Save this address", enter an address, and Ovid defaults to this address each time you want to email an article.
- Save Article Text. While displaying the Full Text of a document you want to save, click the Save Article Text button. Ovid presents you with a Save Full Text Article screen. Select a format (ASCII or HTML) from the scroll menu. Choose ASCII Text if you intend to use the document in a word processor. And select the ASCII format (DOS/Windows, Macintosh, or UNIX) most compatible for your operating system. Or choose HTML to output the document for offline use by an HTML-compatible program such as your Web browser. Once you have made your format selection, click the Continue button. And in the "Save As . . ." screen that appears, provide a name for the file and indicate to where on your hard disk you want the file saved.
From the Links section of the Full Text Navigation box, you can access links to such useful information as abstracts, complete references, and catalog holdings, whenever they are available for the document being viewed.
Finally, when you browse links to other Full Text sources, a History section appears in the Full Text Navigation box. Here, Ovid tracks the titles of all Full Text documents you have linked to and viewed, and enables you to return to them. Select the associated title from the pull-down menu, then click the Go button. This Full Text browsing function allows you to link between the Full Text document being viewed and other Full Text you have viewed. Note: For your ease of browsing, History pull-down menus are also located on the Table of Contents screen, the Issue List screen, and the Journal List screen. But note that the history clears each time you return to the Main Search page.
