 | An Overview of Multifile and Deduping |
Print the Help...
Overview of Multifile and Deduping
Selecting Databases | Searching a Multifile Database | Using Search Fields | Applying Limits | Using Tools | Reviewing Search Results | Removing Duplicates | Reviewing Duplicates | Managing Output with the Citation Manager
The Multifile feature allows you to search multiple databases simultaneously. Deduping allows you to remove duplicates from the resulting search set before viewing, saving, or printing the set. Using Multifile and Deduping is straightforward and intuitive. The most noticeable differences between Multifile and single database searches are the appearance of several new options and screens.
Selecting Databases
Multifile searching allows users to search multiple databases as if they were one database, performing one search for all databases and creating one search set with potential results from all of the databases included in that search.
At sites where Multifile is not enabled, the user clicks on a database name to select that database for searching. With Multifile enabled, your Database Selection Screen resembles the following. Remember that the Database Selection Screen changes only if your site has Multifile searching enabled.
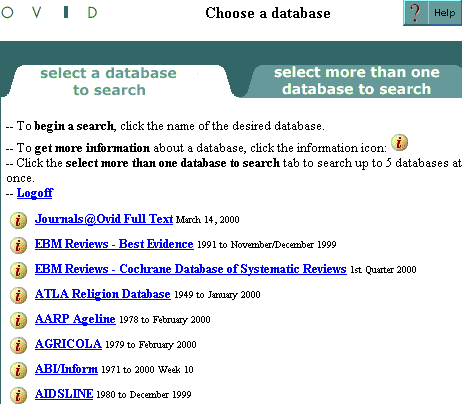
To select one database for searching:
- Make sure the "Select a Database to Search" tab is in front.
- Click on a database name to select that database for searching.
To search multiple databases for searching simultaneously, follow these steps.
- Click the "Select More than One Database to Search" tab. A different section of the Database Selection screen appears.
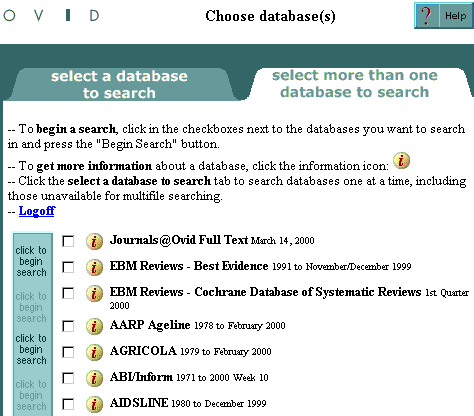
- Select up to five databases by clicking the checkboxes of the databases that you want to search.
- Click on the "Click to Begin Search" column to the left of the database names.
At any time, clicking on a database's information icon  takes you to information about that database.
Non-Ovid databases do not appear in the "Select More than One Database to Search" section--because they are unavailable for Multifile searches.
Ovid has set the maximum number of databases that can be selected for a Multifile search at five. This limit is to ensure good system performance. If you select more than five databases, an explanatory message displays, "Multifile Databases are Limited to 5 Databases", and you remain on the Database Selection Screen, to select again.
Searching a Multifile Database
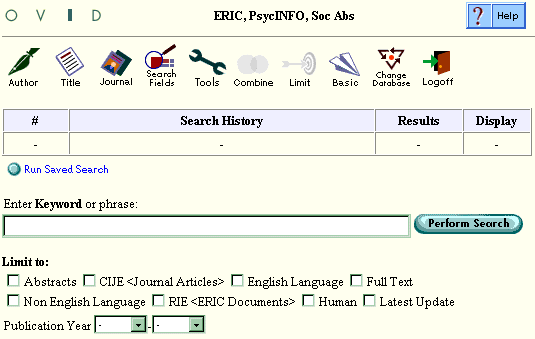
For a Multifile search, the names of the chosen databases display at the top of the screen. This reminds you which databases you have chosen for the search. The list order also indicates the order in which the databases are searched and displayed, and the default order of deduping.
You can change the databases chosen for Multifile searching by using command-line syntax.
The syntax is ..c <databaseshortname>,<databaseshortname>
or use <databaseshortname>,<databaseshortname>, as in:
use medl,nursing
Up to five databases can be selected in this way.
Doing a Simple Search
When a simple keyword search is entered:
- The search terms are searched in all of the chosen databases in the order indicated at the top of the Main Search Page. The results are collected into one search set.
- In each database, the search terms are searched in all of the keyword fields defined for that database. This ensures that all of the appropriate subject-related fields are searched.
Note: Currently, mapping is not enabled in Multifile databases. Mapping works fine in single databases.
Hints for Author and Journal Searching
For Author and Journal searches, where you view indexes and choose entries to search, the indexes of all of the databases are interfiled. This allows you to make selections from all of the index entries from all databases selected for Multifile. Indexing practices sometimes vary slightly from database to database. This means that more than one index entry on the Index Display may apply to the search term, although the entries are slightly different. Improve the completeness of the search results by selecting any and all entries that might be relevant to the search term. Multifile Author searching provides a good example of this. A user searching for the author Margaret Ann Clark in a Multifile database might find entries for "clark m.au." and "clark m a.au", as well as "clark margaret.au". Selecting any and all entries that you think may be relevant is the best way to retrieve the most complete search results.
Using Search Fields
When you click the Search Fields icon and access the Search Fields/Indexes page, all available fields from all of the chosen databases apply.
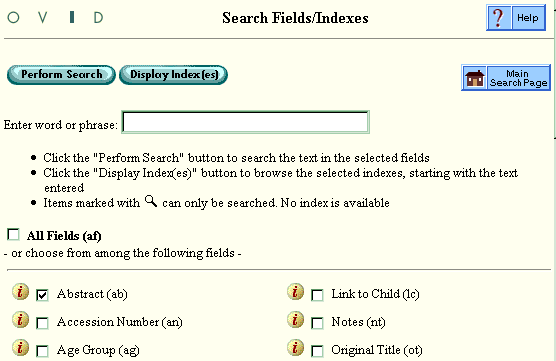
Selecting and applying several fields at a time achieves the most complete search results. For example, if there are several similar-sounding fields that look appropriate, selecting all of them is often a good choice. They may be equivalent fields from different databases.
To get specific information on a particular field, click the
 icon to the left of the field name. The following information
displays:
- all of the databases in which the field is available
- a description of the field for each database
This information makes it easier to select appropriate fields. For example, a user following our previous example and selecting the Abstract field would find that the field is used in all three databases, but the description of the field differs for each database. For example:
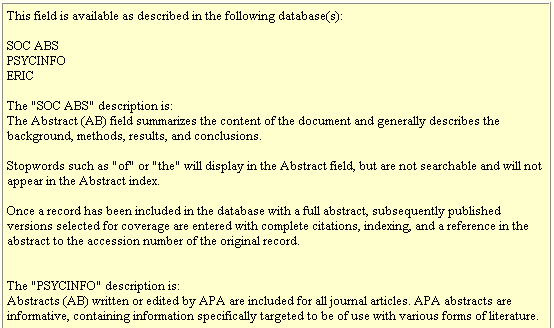
A field is searched in all databases where it applies.
Applying Limits
If you click on the Limit icon and go to the Limit a Search page, you will find that all available limits from all of the chosen databases are offered.
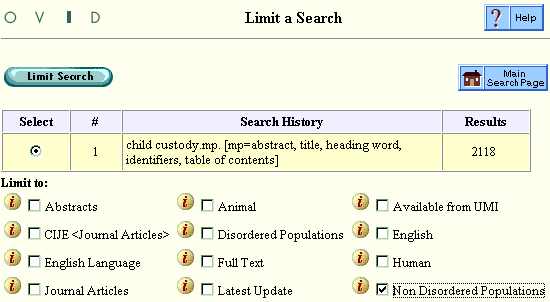
Click the  icon to the left of the limit to see the
following information.
- Which databases the limit applies to;
- How application of the limit will restrict retrieval for each database.
For example, a user clicking on the Non Disordered
Populations information icon (  ) would find the following information
displayed:
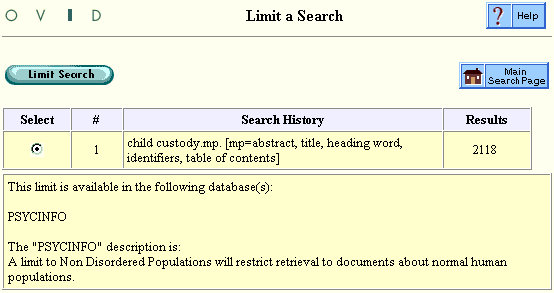
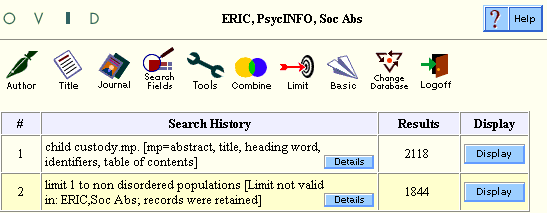
Once limits are chosen and the search is run, the Search History box indicates any databases for which the limit was invalid and what was done with the results from those databases. Generally, when a limit is not valid for a specific database, records retrieved from that database are retained without applying the limit. So, as shown in the example below, limiting to Non Disordered Populations is valid only in PsycInfo and the limit won’t apply to any other databases in the Multifile database. However, the results from other databases are retained.
The exceptions to this rule are ‘terminal limits.’ Terminal limits are limits that are assumed to be relevant to all search results, and that the Ovid software applies to all databases. Current terminal limits are Limit to Full Text and Limit to Latest Update. When you apply a terminal limit, all records that do not meet that criteria are eliminated.
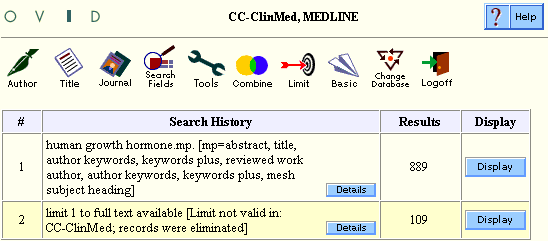
If you choose Current Contents and MEDLINE, search ‘divorce and depression,’ apply Limit to Full Text, and display the results, the system message is different since Limit to Full Text is a terminal limit.
See this example.
Using Tools
When a you click the Tools icon on the Main Search Page, all of the tools from all selected databases are shown.
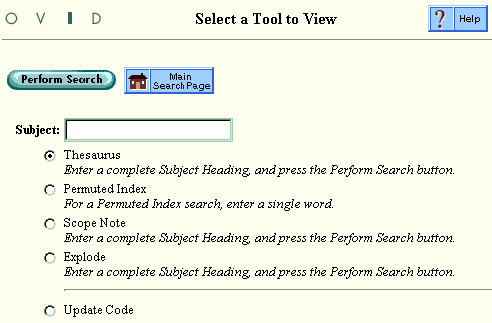
When a tool is available in more than one database, an interim page comes up, allowing you to choose a database format for the tool.
Some Tools, such as Scope Notes, give results that are strictly database-specific. You view the Scope Note for one database at a time. In order to view the Scope Note for a different database, the user clicks a Choose Database button to access the Choose Database Format Screen and select another database.
For other tools such as Thesaurus, the process is slightly different.

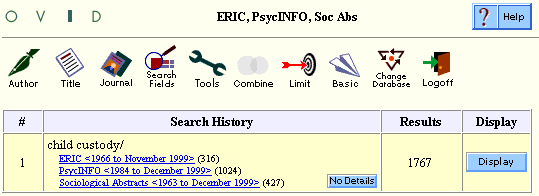
When you choose the Thesaurus tool and then choose ERIC at the Choose Database Format page for example, the tool chosen is the database-specific ERIC thesaurus. Once a search term is selected from that tool, it is applied across all databases, wherever the software can find relevant ‘see terms’ and main terms. This application of see terms is used to ensure that users get the best and most complete results from all databases. In our example, the user has used the Thesaurus tool, chosen the ERIC database format as the preferred format, and received results across all three chosen databases--ERIC, PsycINFO, and Sociological Abstracts--as shown in this sample Search History window.
Reviewing Search Results
Once you enter a search and receive search results, the screen resembles the following example.
The new buttons are Details (located in the Search History window) and Remove Duplicates (located under Search History to the right).
Clicks the Details button, to see how many citations came from each database.

You can link to the records from each database by clicking on the database name in the Details section. It is also possible to link to database-specific records from the beginning of the records display, below the Search History box.
Clicking the No Details button turns the Details display off again.
Removing Duplicates
To remove duplicates from the results set, click Remove Duplicates. The Remove Duplicates screen appears.
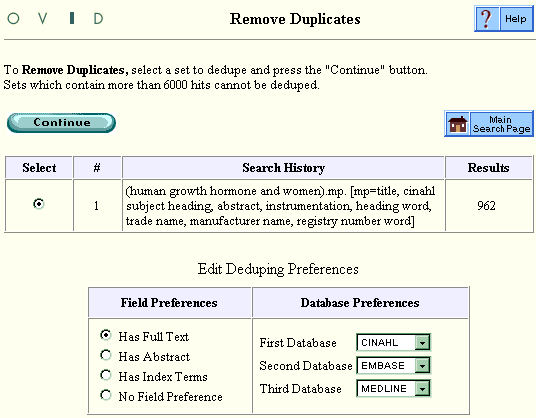
Select a set for deduping. You also can change the Database and Field Preferences set for the deduping process.
The Database Preference function sets the order in which duplicate records from these databases are taken as the preferred duplicate record, in cases where two or more records are duplicates. It reflects the database order given on the Main Search Page.
The Field Preference setting controls which field is preferred when the system is determining a record to keep from a set of duplicates. Ovid’s Deduping process applies field preference, then database preference.
You can select result sets for deduping using command-line syntax. The syntax is ..dedup <recordsetnumber>, as in:
..dedup 2
The default database and field preferences are applied.
Select a set for deduping and choose any preferences, then click the Continue button to be returned to the Main Search Page. If no duplicates are detected, the message "No duplicates were detected!" displays in the Search History box. If duplicates were detected, the screen looks like this example.
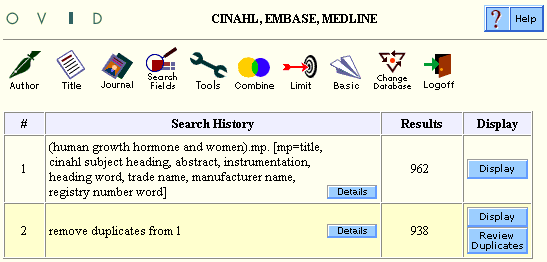
Clicking the Details button at this point once again shows how many records of the deduped set came from each included database, and allows the user to link to the database-specific record sets as desired.
Click the Display button to view the deduped record set.
To ensure speedy deduping, only record sets of reasonable size can be deduped. Ovid’s default is currently set at 6000 records. The software does not allow sets larger than 6000 records to be deduped.
Larger sets may take longer to dedupe. Use limits, fields, and other search options to reduce result set size before deduping.
Reviewing Duplicates
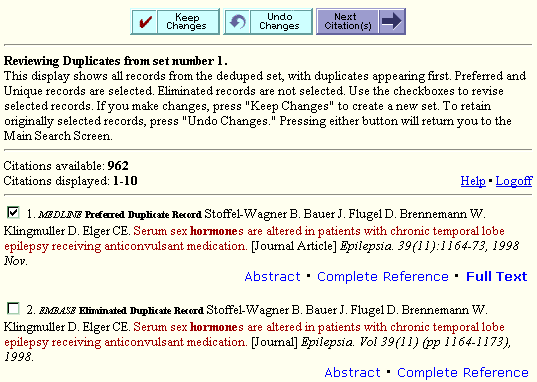
Some users will want to review the eliminated records and perhaps make adjustments to the deduped set. Clicking the Review Duplicates button (underneath the Display button) allows you to review changes and make any desired adjustments. The Review Duplicates screen looks like this.

(To facilitate the review process, the Ovid software re-orders the result set to display the Preferred/Eliminated record pairs first. These pairs are followed by Unique records. This is not the natural order of the set and may differ from what users see when they click the Display button.)
Each record shows:
- which database it came from
- whether it is a Preferred Duplicate Record (the one chosen by the deduping algorithm for the record set), an Eliminated Duplicate Record (one that was eliminated), or a Unique Record (one that had no duplicate)
Preferred and Eliminated records that correspond are at the top of the Review Duplicates result set. While choosing records for preference, the software applies the database and field preferences chosen on the Remove Duplicates screen. For example, a MEDLINE citation is chosen because MEDLINE was the preferred database format over CINAHL or EMBASE, or a record that links to full text is chosen over one that does not.
Modify the system’s selection of preferred records as desired. (Records are selected by clicking their checkboxes.) For example, an Eliminated Duplicate Record can be selected for inclusion along with, or instead of, a Preferred Duplicate Record. Or you can deselect a Preferred Record. Click the Next Citations and Previous Citations buttons to navigate through the result set and continue reviewing the duplicates.
When the review process is complete, click Keep Changes or Undo Changes.
- Keep Changes preserves any changes and posts a new record set to the Main Search Page.
- Undo Changes nullifies any changes, returning you to the Main Search Page without posting a new set.
Managing Output with the Citation Manager
The output from a Multifile search is managed using the Citation Manager, which appears at the bottom of the Main Search Page and the display pages.
If a citation format is not available in all of the databases included in the Multifile search, it does not display in the Citation Manager. For example, the Comma-Separated format only displays when all databases selected are Current Contents databases.
If a you choose the Select Fields option from the Citation Manager, all fields from all databases display. Select the fields that will be most useful, and the Ovid software applies them across all databases. If the field has no equivalent in a particular database (for example, the RIE field applies to no database other than ERIC), the Ovid software ignores the field when displaying citations from that database.
You can also use the Citation Manager to sort the set before viewing, printing, or emailing the results.
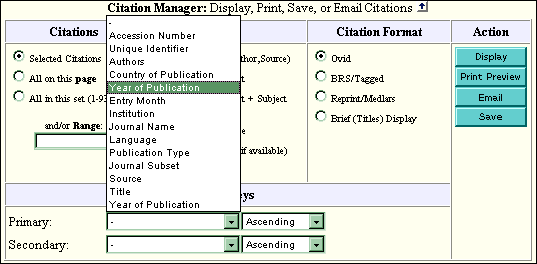
You can select a primary field to sort on or select primary and secondary sort fields. Also, you can choose to sort each field in ascending or descending order. For example, it might be useful to sort results by Source in ascending order, thus sorting the results by journal name and making it easier to look up several different articles from one journal. Or a user might decide to sort first by Source in ascending order, and use Year of Publication as a secondary sort in descending order.
The available sorting fields vary according to the databases chosen for the Multifile sort. When possible, the software uses aliases to apply fields across databases. However, the software ignores a sort field when performing the sort in a database that does not have that field or an equivalent. This also happens in any other records that lack the field. Any records that do not have the field appear at the end of the sorted results.
